Replacing a light switch feels intimidating because it involves electricity. And yes, electricity deserves respect. But a standard single pole light switch replacement is actually one of the safest and simplest electrical repairs a homeowner can do as long as you follow one absolute rule: always turn off the power first.
I replaced my first light switch after years of living with one that sparked slightly every time I used it. The job took about 15 minutes, and the new switch has worked perfectly ever since. Here’s how to do it safely.
What You’ll Need
- Replacement light switch (standard single pole, about $3)
- Flathead and Phillips screwdrivers
- Voltage tester ($10 this is essential for safety)
- Needle-nose pliers
- Electrical tape
- Masking tape and marker (to label wires)
Step by Step Instructions :
Step 1: Turn off the power at the breaker
Go to your electrical panel and flip the circuit breaker for the room where you’re working to the OFF position. Do not rely on just flipping the wall switch off go to the breaker. Then test the switch to confirm the light no longer works.
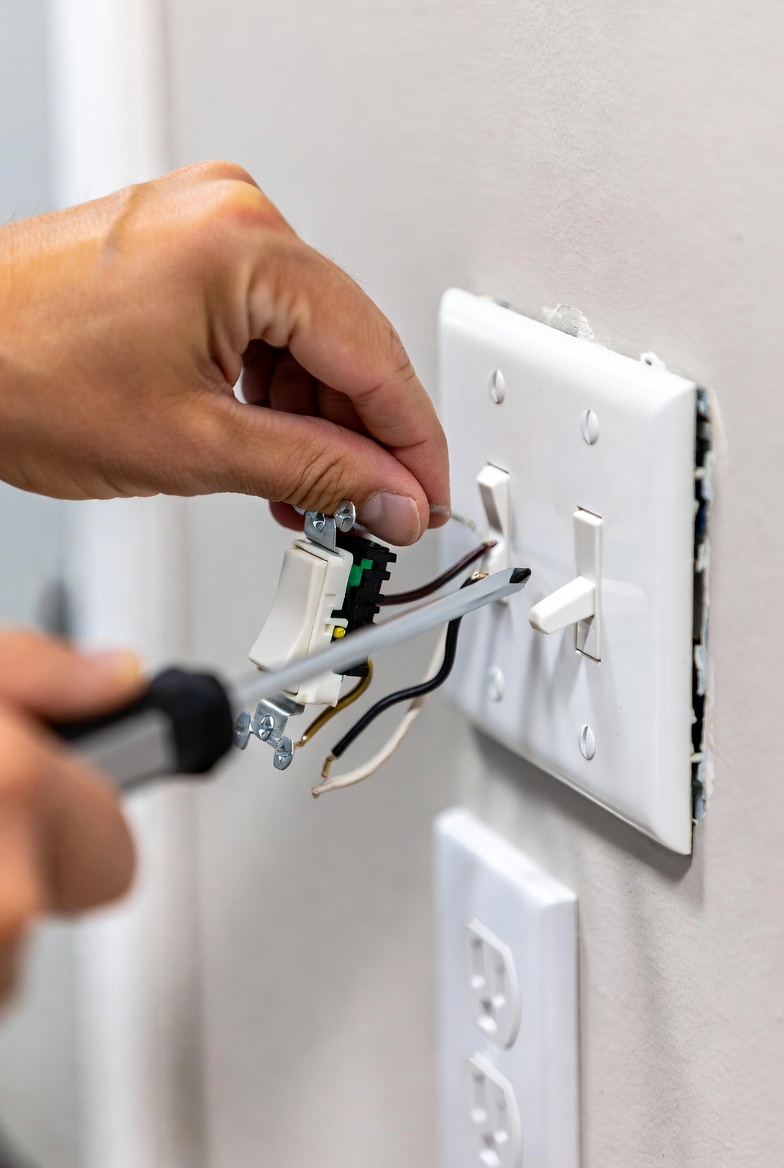
Step 2: Test the wires with a voltage tester
Remove the switch cover plate (one or two screws), then unscrew the switch from the electrical box. Carefully pull the switch out from the wall, leaving the wires connected. Use your voltage tester to touch each wire. There should be zero voltage on every wire. If the tester beeps or lights up, the power is still on go back to the breaker panel.
Step 3: Label and photograph the wires
Before disconnecting anything, take a clear photo of the existing wiring with your phone. Label each wire with masking tape if needed. Most standard switches have two black wires (or one black and one white marked with black tape), plus a bare copper ground wire.
Step 4: Connect the new switch
Loosen the screws on the old switch and remove the wires. Connect them to the new switch in the same positions: black wires to the brass screws, bare copper to the green ground screw. Tighten all screws firmly a loose connection is a fire hazard. Never leave a wire just touching a screw without being secured.
Step 5: Reassemble and restore power
Carefully fold the wires back into the electrical box and screw the new switch into place. Attach the cover plate. Go back to the breaker panel and flip the circuit back on. Test the new switch it should work smoothly and silently.
Pro Tips
If you see three wires instead of two (not counting the ground), you may have a 3 way switch that controls a light from two locations. Three way switches are slightly more complex the wiring is different and you’ll want to look up the specific wiring diagram for your switch brand.
Never work with aluminum wiring (it looks silver instead of copper) without consulting a licensed electrician. Aluminum wiring requires special switches and specific handling.
Final Thoughts
Replacing a light switch is a gateway electrical repair once you’ve done it safely and successfully, you’ll feel confident tackling other basic electrical jobs like replacing outlets and ceiling fixtures. The key is always the same: verify the power is off before touching any wire.