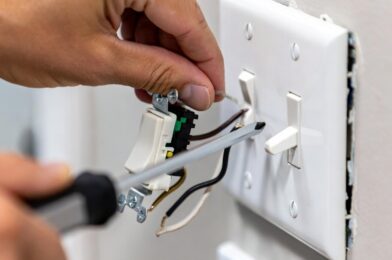
A cracked, discolored, or non-functioning electrical outlet is both an eyesore and a potential safety hazard. Replacing it is a straightforward repair similar in difficulty to changing a light switch and takes about 20 minutes once you’ve gathered your tools.
As with any electrical work, the procedure for staying safe never changes: turn off the power, verify it’s off with a tester, then work. The actual wiring is simple because you’re not changing the circuit just swapping one outlet for an identical one.
What You’ll Need
- Replacement outlet (standard 15A, or 20A if replacing a 20A outlet)
- Flathead and Phillips screwdrivers
- Voltage tester (non contact type essential)
- Needle nose pliers
- Wire stripper (if needed)
- Electrical tape
- Masking tape and marker
Step by Step Instructions:
Step 1: Turn off the circuit breaker
Go to your electrical panel and turn off the breaker for the circuit you’re working on. Then plug a phone charger or lamp into the outlet you’re replacing and verify that it has no power. Double check with your non-contact voltage tester hold it near the outlet slots and confirm it doesn’t beep or light up.
Step 2: Remove the cover plate and outlet
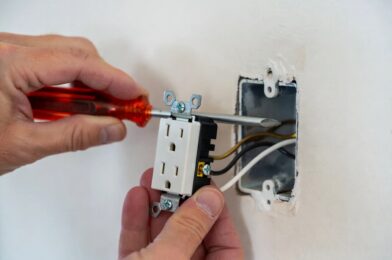
Unscrew the single center screw holding the cover plate. Then remove the two screws holding the outlet to the electrical box one at the top and one at the bottom. Gently pull the outlet out from the box, pulling the wires with it. You’ll have about 6 inches of wire to work with.
Step 3: Test again before touching any wires
Even with the breaker off, test again. Hold your voltage tester near each wire individually. There should be no signal on any wire. If there is any signal at all, go back to the panel you may have turned off the wrong breaker.
Step 4: Photograph and disconnect the wires
Take a clear photo of the outlet showing which wire connects to which terminal. There will be a black wire (hot) on the brass-colored screw, a white wire (neutral) on the silver screw, and a bare copper or green wire on the green ground screw. Loosen each screw and remove the wires, or if the wires are poked into the back holes (backstabbed), insert a small flathead into the release slot to free them.
Step 5: Connect the new outlet and test
Connect the wires to the new outlet in the same configuration: black to brass, white to silver, bare copper to green. Use the screw terminals rather than the backstab holes screw connections are more secure and less prone to failure over time. Tighten all screws firmly, fold the wires back into the box, and screw the outlet in. Replace the cover plate, restore power at the breaker, and test the outlet with your phone charger.
Pro Tips
If the outlet you’re replacing has three holes (two vertical slots plus a round hole), it’s grounded and should be replaced with a grounded outlet. If the old outlet has only two holes, you have ungrounded wiring consult an electrician about the best approach rather than installing a three hole outlet that appears grounded when it isn’t.
GFCI outlets (the kind with the test and reset buttons, used in kitchens and bathrooms) are replaced the same way but have additional line and load terminals. Replace GFCI outlets with GFCI outlets.
Final Thoughts
Replacing an electrical outlet is a satisfying repair that improves both the safety and appearance of your home. The key is treating the power verification step as absolute not a formality, but the step that makes everything else safe. With the power confirmed off, the wiring itself is simple.