Old, cracked, or moldy caulk around a bathtub is one of those things that makes an otherwise clean bathroom look neglected. It’s also a practical problem water gets behind deteriorating caulk and causes water damage and mold growth inside the wall. Recaulking a tub is one of the most impactful small projects you can do in a bathroom.
The whole process takes about an hour of active work, plus drying time. The tools cost next to nothing, and a quality tube of caulk is around $8-$12. Here’s how to do it in a way that actually lasts.
What You’ll Need
- 100% silicone caulk (white or clear, bathroom rated)
- Caulk gun
- Utility knife or oscillating tool
- Caulk remover tool (plastic, about $3)
- Rubbing alcohol and clean cloth
- Painter’s tape
- Spray bottle with water and a drop of dish soap
- Old spoon or caulk finishing tool
Step by Step Instructions:
Step 1: Remove ALL the old caulk
This step is non-negotiable. Applying new caulk over old caulk never works well it peels within months. Use a utility knife to score along both edges of the old caulk, then use the caulk remover tool to peel it away. Take your time and remove every trace of the old material, including any that’s worked its way into gaps in the tile.
Step 2: Clean and dry the surface completely
Wipe the entire joint with rubbing alcohol to remove soap scum, body oils, and any remaining caulk residue. Then let it dry for at least one hour. New caulk will not bond properly to a damp surface, and this is the most common reason fresh caulk peels away within a few months.
Step 3: Apply painter’s tape for clean lines
Run two strips of painter’s tape along both edges of the joint, leaving just the gap you want to fill exposed. This creates perfectly straight lines on both sides and makes cleanup much easier. Press the tape edges down firmly.
Step 4: Fill the tub with water before caulking
This sounds strange but it’s a professional trick. A full tub is heavy and pulls the tub slightly away from the wall. If you caulk with an empty tub and then fill it, the weight can crack the fresh caulk. Fill the tub first, caulk, let it cure, then drain it.
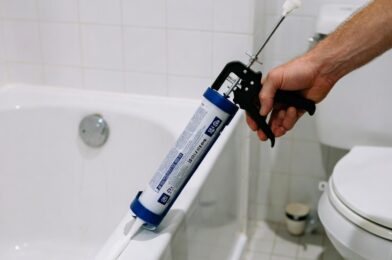
Step 5: Apply and smooth the caulk
Cut the caulk tube tip at a 45 degree angle (smaller is better you can always cut more off). Apply a steady, continuous bead along the entire joint without stopping. Immediately spray the bead lightly with your soap-and-water mixture and smooth it with the back of an old spoon, running it along in one smooth motion. Remove the painter’s tape while the caulk is still wet.
Pro Tips
Let silicone caulk cure for a full 24 hours before using the tub. Getting it wet before it cures can prevent it from bonding properly and it will peel away much sooner.
If you see black mold in the old caulk joint, clean the area with a bleach solution before applying new caulk. Sealing mold under new caulk doesn’t kill it it just hides it temporarily while it continues to grow.
Final Thoughts
Good caulk work around a bathtub can last 5-10 years when done correctly. The preparation removing old caulk and drying the surface thoroughly is what determines whether your new caulk lasts months or years. Take the time to do it right and you won’t need to do it again for a long time.